How to Compost at Home Step-by-Step with [Infographic]
If you missed it, Wednesday’s post dove into my composting experience and about everything you need to get started to compost at home. By no means is it the only or even best way to compost — but it’s the way I do it and it works for me, so I figure it was worth sharing with you! I opt for a more hands-off, cold composting process at my home for the sake of time and energy. We aren’t ever in a rush to get the contents out to our home garden so the process is stretched out over a 6+ month time frame.
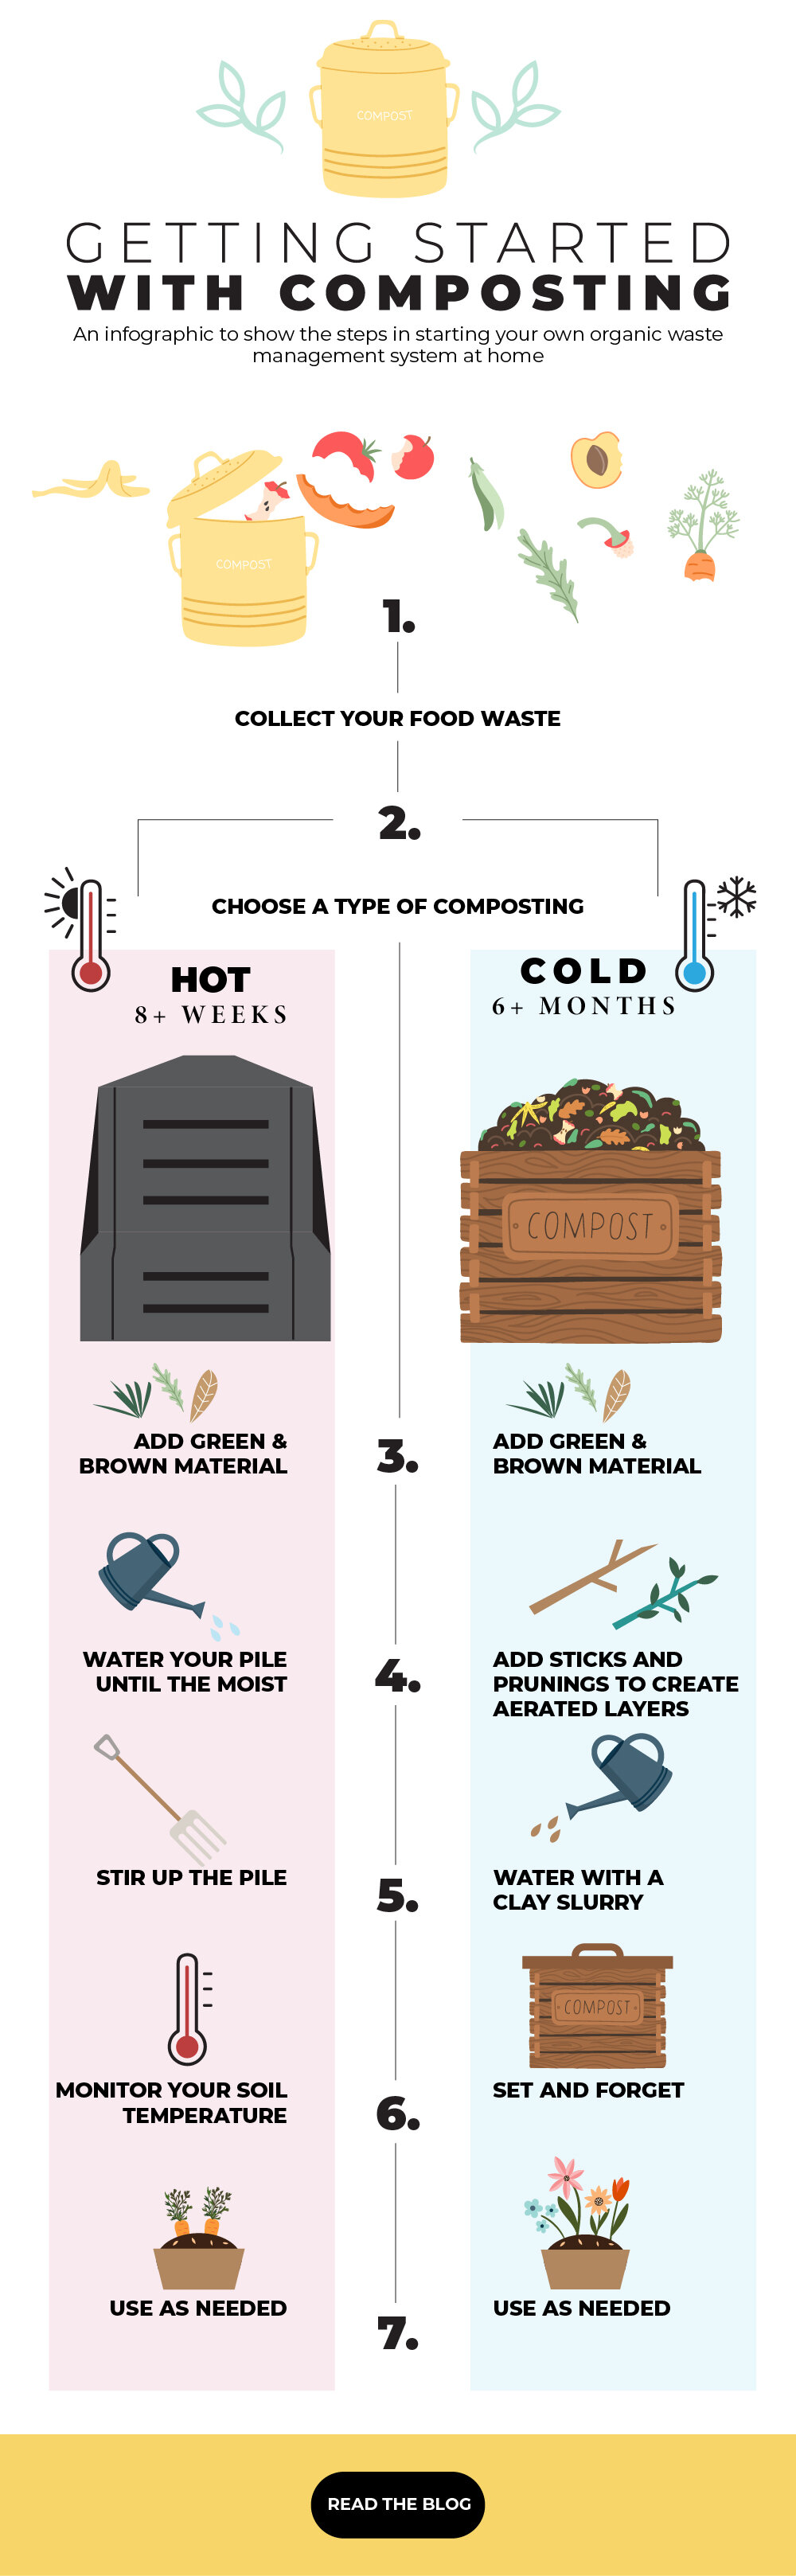
For all the visual learners out there, I decided to also put together a better set of clear instructions on how you can start with both hot and cold composting at your home, and identify the differences in the methods so you can choose which is best for you. For starters, let me share what the difference is between hot and cold composting.
What is Hot Composting?
Hot composting is a process that breaks down organic goods in a short amount of time with the help of a microbial activity. Hot composting requires extra care to ensure the pile is regularly moistened, tilled, and maintained at a temperature between 130 and 140 degrees. With diligent care, a hot composting pile can break down in as little as 8 weeks.
What is Cold Composting?
Cold composting, on the other hand, is a composting method that requires little maintenance. Coined by me as the ‘lazy composter’s method’, cold composting requires occasional water, and stirring, though it takes considerably longer to break down. A cold compost pile can take 6 months or more to break down.
Now here is a clear look at how you can get started with each process:
Hot Composting: 8+ Weeks
1. Collect your food waste
Before starting, you will need to collect your organic waste from home. You can use a tin composting bin, old plastic container, or sealable bag. Collect scraps from fruits, vegetables, clean eggshells, coffee grinds & paper filters, teabags, human & pet hair, newspaper without coloured ink, paper bags & napkins.
2. Decide on what type of composting works best for you
There are two methods of composting; Hot and Cold. It is important to decide which method is best for you to determine the tools that you will need. Hot composting can allow materials to break down in as little as 8 weeks but it requires ongoing maintenance. Cold composting can take over 6 months for materials to break down, but it requires little maintenance.
3. Combine your green and brown materials
Combine your collected kitchen scraps and mix them with green materials such as yard debris, grass clippings, leaves, or mulch. Place into your composting container of choice, a bin or tumbler.
4. Water your pile
It is important to keep the pile very moist to encourage bacteria and decomposition. Keep an eye out on watering your pile regularly to ensure it maintains moist throughout the process.
5. Stir up the pile
Just like moisture, it is important to keep the materials mixed well. This allows the bacteria to reach every area of the pile and encourages equally distributed effects.
6. Monitor your soil temperature
Use a thermometer to regularly monitor the soil’s temperature. The optimal range for microbial activity is between 130 and 140 degrees. Should your pile fall outside of that range, you will need to do research to determine the cause and how to fix it.
7. Add to your lawn or garden
Once you see that all contents have broken down into a dark brown, crumbly, consistency you can transfer the pile contents to your nearby lawn or garden. This process can take anywhere from three weeks to three months depending on temperature, weather, and moisture levels.
Cold Composting: 6+ Months
The first two steps are the same as in the hot composting process.
3. Combine your green and brown materials
Combine your collected kitchen scraps and mix them with smaller green materials such as grass clippings, leaves, dirt, or mulch. Keep larger debris to the side to layer in with the compost. Place the mixed materials into your composting container of choice, a bin or tumbler.
4. Add sticks and prunings to create aerated layers
Between the layers of organic waste and small green materials, add sticks and larger yard debris to create space for the materials to naturally move and fall through as they break down. This will also help with water retention.
5. Water with a clay slurry
While arranging the contents in your container, spray each layer until moist. Consider adding in some wet clay to further increase the water content for a longer period of time.
6. Set and forget
The cold composting method does not require much maintenance. Once your materials are layers and set, you are free to leave nature to do it’s work. Consider adding some extra moisture from time to time, but there is no set schedule for this.
7. Add to your lawn or garden
After 6 or more months have passed, check the container to ensure all materials are broken down into a dark brown, crumbly compost. You can then add the contents to your nearby lawn or garden.
I hope you enjoyed this step-by-step guide. Till next time…

Hey, Claudia here
I am a senior graphic designer, a dog mom, an advocate for a zero-waste lifestyle, climate change, and sustainability. My articles are based on personal experience and well researched to give you the best source of information for all things zero-waste.